

Mixer Truck Washing Machine Fabrication: Essential Steps and Considerations
2026-08-13
Mixer drums are unforgiving. Leave residual concrete alone for a shift, and you’re facing chisel work, wasted hours, and a shorter drum life. That’s why fabricating a mixer truck washing machine demands more than bolting nozzles onto a frame—it calls for smart decisions about pressure, positioning, and materials. Drawing on real-world build experience from Sinou, we break down the essential fabrication steps and the considerations most teams only learn the hard way.
Start with a Frame That Won’t Twist Under Daily Truck Traffic
A truck frame that flexes every time it hits a pothole or crosses a railroad track will eventually crack somewhere you can't see. The real test isn't the showroom shine—it's the cumulative stress of stop-and-go hauling, uneven loading, and constant road vibration. A rigid frame keeps the cab, bed, and suspension mounting points aligned, so the truck tracks straight and doesn't develop mysterious rattles after 50,000 miles.
Most factory frames are adequate for stock use, but once you add heavier springs, larger tires, or a utility bed, the extra leverage exposes weak crossmembers and thin rail sections. Look for fully boxed rails, reinforced joints around the steering gear, and gussets at high-stress corners. These details don't show up in a spec sheet, but they're the reason one truck still feels tight after five years of job-site runs while another starts wandering on the highway.
Choosing Steel Thickness and Coatings for Constant Wet Conditions
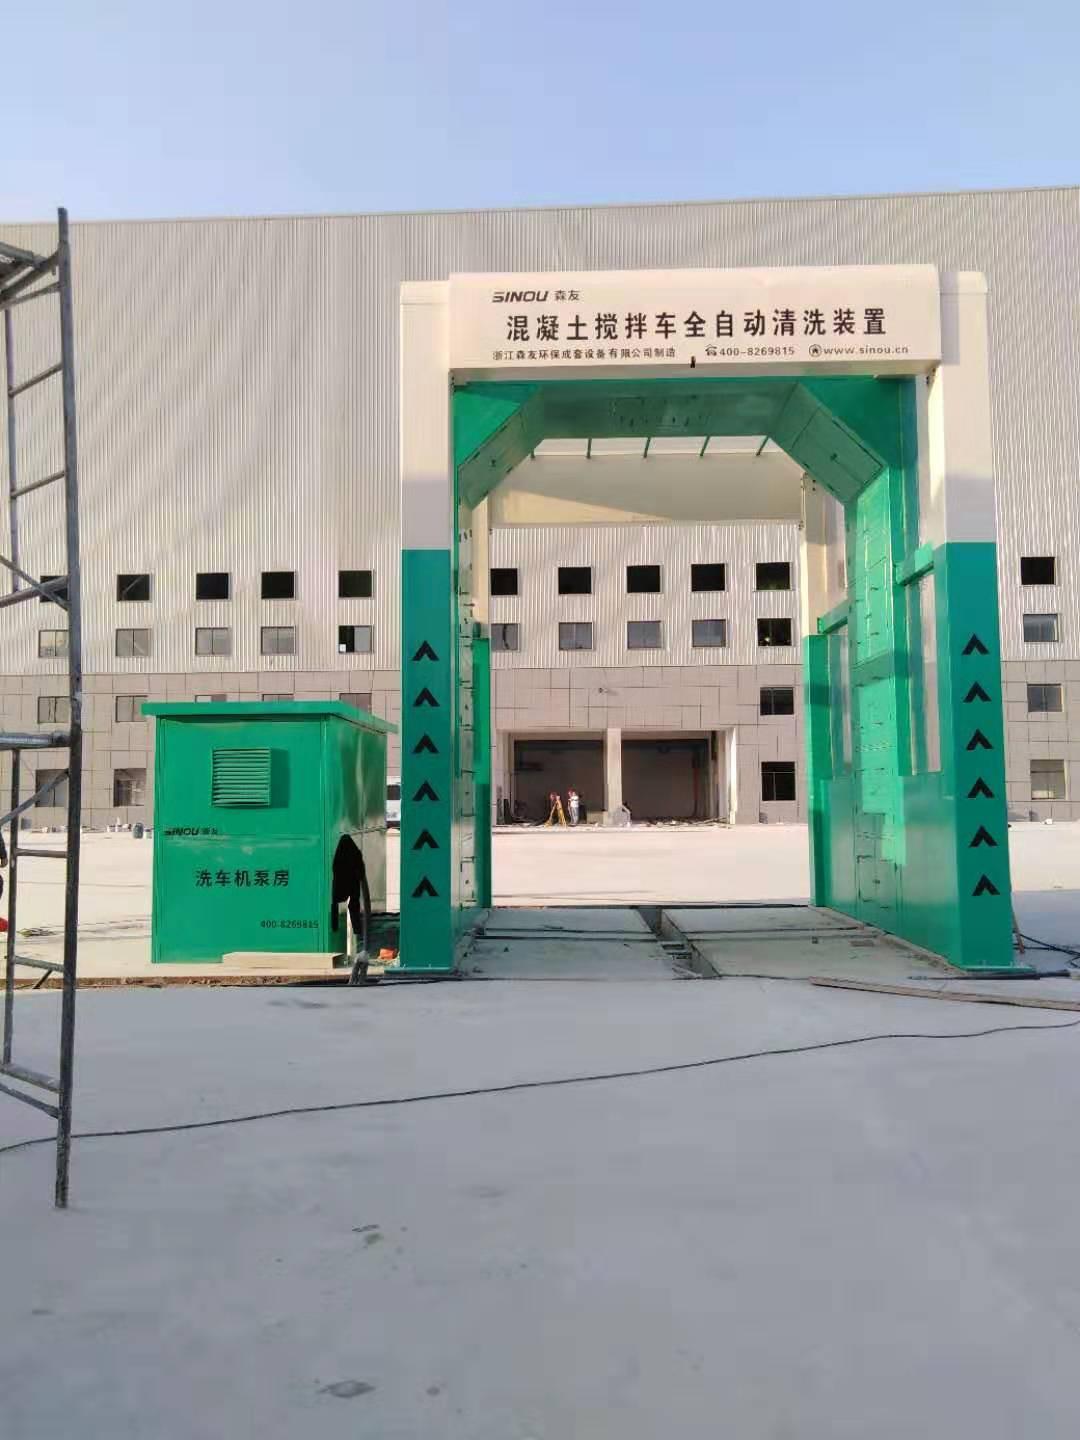
Constant wet conditions punish steel in ways that dry exposure never does, so the first decision is not just coating type but how much metal you are willing to lose. For immersed or perpetually damp service, start with a corrosion allowance of at least 1.5 to 3 mm beyond the structural minimum. This extra thickness accounts for uniform loss and, more importantly, for pitting that develops at microscopic coating defects. Water chemistry changes the math: chloride-rich or acidic runoff can triple the local corrosion rate, while oxygen-starved stagnant water sometimes slows it. Rather than trusting a generic table, pull actual water quality data or inspect nearby steel that has already aged in the same environment.
Coatings for constant wetness need a different mindset than those for atmospheric exposure. Alkyds and standard acrylics fail early because water molecules penetrate and break the bond at the steel interface. High-solids epoxy primers with amine or polyamide curing agents form a denser film and remain the workhorse for immersion. A polyurethane topcoat adds abrasion and UV resistance for areas that alternate between wet and sun, such as tide zones or tank tops. Galvanizing alone can work if the pH stays between roughly 6 and 12.5, but soft water, acidic condensate, or runoff from treated lumber can strip zinc in a few years. A duplex system—hot-dip galvanizing plus an epoxy intermediate and urethane finish—often outlasts either alone, especially where wetting and drying cycles concentrate salts.
Practical details decide whether the system survives. Sharp corners, skip welds, unsealed lap joints, and threaded fasteners create crevices where water lingers and coatings are thin. Specify rounded edges, continuous fillet welds, and sealed faying surfaces to remove these traps. Dry film thickness matters more than the number of coats: for constant immersion, a 300 to 400 µm epoxy system is a common starting point, but exceeding the manufacturer’s maximum can cause mud-cracking or solvent entrapment. Finally, think about access. If re-coating means draining a tank, shutting down a process, or building scaffolding over water, a thicker steel section and a premium coating are cheaper than three maintenance cycles over the same service life.
Positioning Spray Nozzles to Hit the Mixer’s Blind Spots
Most mixer cleaning failures trace back to a handful of shadowed zones behind baffles, shaft couplings, and discharge gates. A nozzle mounted dead-center or too close to the wall will wash the open volume but leave a thick residue ring exactly where the next batch picks it up. The first move is to map those recesses with a simple light test or a dry-run with dyed water before bolting anything in place.
Once the hidden pockets are identified, angle the nozzles so the spray fans intersect inside the dead areas instead of just skimming their edges. A common trick is to cant a flat-fan nozzle 15 to 30 degrees off the radial line and aim the impact point just beyond the deepest seam. For stubborn corners, pair a narrow jet for penetration with a wider fan to flush loosened material back into the main wash flow.
After repositioning, run a short rinse cycle and check the suspect spots with a fingertip or a white cloth. If a shadow remains, shift the nozzle closer to the opening by no more than a quarter of an inch and repeat. Small adjustments often matter more than adding pressure or flow, since a well-aimed nozzle at moderate pressure will outperform a poorly aimed one at full blast.
Building the Wash Bay Around the Real Turning Radius
Most wash bay layouts fail before the first vehicle pulls in. The culprit is rarely drainage or chemical storage—it's the turning radius. Engineers tend to fall back on standard passenger-car arcs, but a loaded concrete truck or a long-bed dually doesn't pivot like a sedan. Building the wash bay around the real turning radius means observing your actual fleet, not a generic template.
Start by measuring the largest vehicle that will ever use the bay, with its mirrors extended and any trailer attached. Mark the true outer wheel path in a test lot using chalk or water. Then add a buffer of at least two feet on each side, because drivers under time pressure cut corners. This approach eliminates the guesswork that leads to scraped fenders and bent guide rails.
Once you have the turning envelope, position entry bollards, wash arches, and foam cannons outside that path. Leave extra room near the exit for a loaded vehicle to straighten out gradually. A bay shaped around real-world maneuverability looks less like a showroom and more like a working area—which is exactly what keeps your fleet moving without costly rework.
Wiring Pumps and Sensors for Simple Troubleshooting Later
Take the extra ten minutes now to label every wire at both ends, and you'll thank yourself when a sensor quits at 3 a.m. Use heat-shrink labels or even a sharpie on light-colored jacket—just make sure the code matches your schematic exactly. There's nothing worse than tracing a bundle of identical red wires behind a panel while the tank overflows.
Build in test points from day one. A simple DIN-rail terminal block with ferrules beats twisting wires together and burying them in conduit. If a pump stops, you can clip a multimeter onto the terminal in seconds instead of stripping insulation or unwrapping tape. For sensors, consider adding a disconnect plug near the device so you can swap in a known-good spare without rewiring the whole run.
Don't daisy-chain power through every sensor just to save a few feet of cable. Run separate fused feeds to each branch, or at least group them by zone. When one faulty device shorts the line, only that branch drops out—and the label on the fuse tells you exactly which corner of the machine to walk toward first.
Running a Muddy Test Batch to Expose Weak Points
A muddy test batch isn't about clean scenarios. It's deliberately throwing in malformed records, edge-case timestamps, duplicate entries, and half-finished user inputs all at once. The goal is to see which assumptions in your code break first, not to confirm that the happy path still works.
When you run this kind of test, the weak points tend to surface quickly: an unhandled null in a nested field, a date parser choking on an unexpected format, or a race condition that only appears when two bad records arrive in the same second. Fixing those issues early feels messy, but it beats discovering them in production.
One practical approach is to keep a folder of intentionally broken payloads and add a new one every time a bug slips through. Over time, that folder becomes a realistic stress test—not a pristine sample set, but a collection of real-world garbage your system should survive.
FAQ
Start by mapping out the specific truck dimensions and the type of residue you are dealing with. Fresh concrete demands different pressure and nozzle angles than cured buildup, so getting this right early prevents costly rework and ensures the wash bay frame, spray arches, and drainage can handle real-world loads.
Prioritize galvanized or stainless steel for any structural components that get wet, and opt for polypropylene or HDPE panels where abrasion is intense. Avoid unprotected mild steel because even with paint, it will rust through around welds and joints within a season or two.
A closed-loop system should not be an afterthought. Design the settling tanks, sludge conveyor, and filter screens into the base frame from the start so the wash water can be reused multiple times before top-up. This cuts operating costs and keeps the site compliant with runoff rules.
A combination of high-volume low-pressure flood nozzles to soften the material and high-pressure rotating nozzles to peel it away works well. Position them so they hit the drum's fins and the chute's underside, as those are the areas drivers often miss with manual rinsing.
Build in emergency stop cords along the wash bay, anti-slip grating on platforms, and physical guarding around rotating spray arms. Also include a pressure relief valve and a low-water cutoff on the pump skid, because retrofitting these after the frame is welded is far more difficult.
Use bolt-on access panels instead of welded covers for the pump, filters, and electrical enclosure. Route pipes and cable trays along the outside of the main frame with clear labeling, and add drain ports at every low point so the system can be fully emptied before winter.
The volume of solids that accumulate from a fleet of trucks is usually underestimated. A good rule is to size the first settling chamber for at least one full day's washing load, and include a drag-chain or screw conveyor that can run independently while the wash cycle continues.
Make the wash bay width and height adjustable with bolt-together extensions, and leave spare flanged connections on the pump manifold for additional spray arches. Use a modular control panel with extra I/O points so new sensors or a second wash lane can be added without rewiring the whole cabinet.
Conclusion
Fabricating a mixer truck washing machine starts with a frame that can shrug off the constant twisting and pounding of daily truck traffic—anything less will crack at the welds within months. Steel choice matters just as much as thickness, because standing water and alkaline wash chemicals eat through ordinary coatings fast; spec a hot-dip galvanized or epoxy-coated schedule 40 minimum if you want the structure to outlast the warranty. Nozzle placement is where most designs fall apart, so angle the high-pressure jets to reach behind the drum fins, inside the charging hopper, and under the discharge chute instead of just blasting the obvious sides. If you miss those blind spots, you’re only cleaning half the mixer.
The wash bay itself has to be built around the truck’s actual turning radius and the way drivers really swing in and out—tight corners or poorly placed guide rails turn a wash into a three-point maneuver every time. On the electrical side, keep pumps and sensors simple: label every valve, run wiring through sealed conduit, and mount the control panel where a soaked operator can actually reach it without climbing. Before handing the system over, run a muddy test batch through the full cycle with fresh concrete residue, note where solids pile up or nozzles clog, and adjust from there. The goal is a machine that survives real jobsite abuse, not a showpiece for the shop floor.
Contact Us
Contact Person: HaiYan
Email: [email protected]
Tel/WhatsApp: +86 18957325588
Website: https://www.senyoubeton.com/